Manual
Basics
What is convolution?
Convolution can be described in many ways. It's a simple mathematical operation. It's also a way to transform a sound into any location where someone has recorded an Impulse Response file. But what if the Impulse Response didn't represent a real space? What if the space was constantly moving and shifting?
What makes Aava unique?
With traditional convolution solutions – whether hardware or software – if you adjust certain parameters like the IR starting position, fade or length, that change won't be smooth or immediate. At worst, you will get a loud crack or pop followed by a short pause as the new parameters are calculated. At best, you will get a crossfade between the old and new versions as the IR with new parameters is introduced.
With Aava, any parameter in the UI can be adjusted at real-time with no glitches or crossfades while keeping tails intact (if you want). All parameters can also be modulated with either internal or external modulators, at up to audio rates (the internal LFO and S&H modulators go up to 100Hz)! You decide how often parameters get applied based on musical needs and how much processing power you have available.
Controlling the plugin
- Hold
Shift to fine tune most parameters, including IR handles
- Double-click to reset a paremeter to its default value
Cmd / Ctrl click most parameters to enter a value manually- See the bottom bar for per-control hints on which controls work
Presets

- Use the leftmost, small dropdown or arrows to select the preset category
- User presets are always stored in the User category
- Use the bigger dropdown or arrows to select the preset within the selected category
- Use the save button to save a user preset
- Use the "new document" icon to create a new preset
- Use the reset button to reset to the last saved state
- Use the trash can icon to delete the selected preset
Preset categories
- User category contains presets you have saved
- Delays and More has presets that you might almost get out of a delay plugin, but with unique twists
- Explore category includes presets taking advantage of the Explore map
- Impossible Spaces could be recorded in an actual space if you lived in a 7-dimensional galaxy or a room that was constantly changing shape
- Mangle presets will filter or change the incoming sound while not making it completely unrecognizable
- Movement presets feature extensive modulation
- Pitched presets use key tracking so you should use them with incoming MIDI notes; these work best with percussive inputs or noise
- Unfathomed presets really mess up the source sound; don't expect to use these in a beautiful ballad
- Vast presets might take a while to settle so use with care
Impulse responses
IR parts
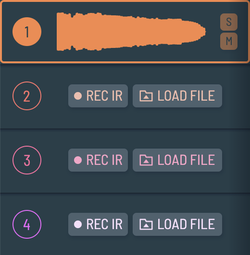
Aava offers four parts each with their own IR buffer and parameters.
- Select which part to edit by pressing one of the slots
- Solo or mute parts by pressing the S and M buttons.
- If a part is empty, press the REC IR or LOAD FILE buttons to quickly record or load an IR
The IR editor
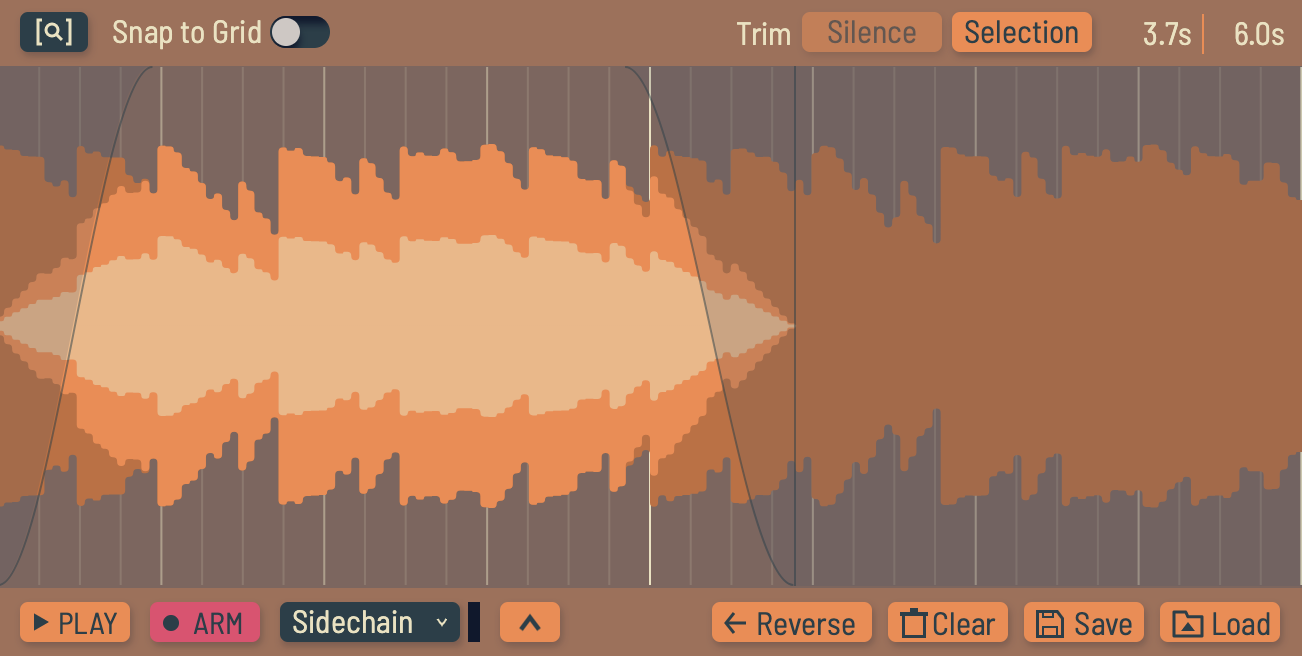
With the IR editor, you can load new IRs, trim and adjust fades, save IRs you have edited, etc. You will hear the effect of all edits at the next IR refresh.
Top pane

- Use the zoom button to toggle showing either the full IR or just the selected section
- Enable Snap to Grid to snap handles to 1/16 notes when moving (only with Rhythmic IRs, see IR parameters)
- Trimming Silence will automatically remove silent parts from the beginning and end of the IR
- Trimming Selection will remove everything outside the trim handles from the IR
- You can see the selected and total lengths of the IR in the top right corner
IR handles
Handles appear when you move your cursor over the IR editor. The handle that will move if you start dragging the cursor is highlighted.
- Use the circular handle with arrows to move the start or end trim point
- Use the rectangular handle with a fade curve to adjust fade in/out duration
- Hold
Shift while dragging to zoom in for detailed adjustment
Recording IRs

With Aava you can record IRs while simultaneously using them for convolution!
- Press the Play button to preview what has been loaded or recorded into the IR buffer (this will only play the selected part)
- Press the ARM button to arm the part for recording (when Sync to Host is enabled)
- Press the REC button to start recording immediately (when Sync to Host is disabled)
- Press the dropdown to select the recording source; either the main input, the sidechain input or the wet output of the plugin (before dry/wet mix)
- Press the arrow up/down button to either open the recording options pane or close it
- With Punch disabled, recording will start from the beginning of the buffer and extend the buffer (up to 10 minutes in length) if it reaches the end
- With Punch disabled, recording will be contained to the selected area and stop when it reaches the end
- With Loop enabled, Punch recording will continuously record in the selected area, looping back to the start when it reaches the end
- TIP: enable Punch and Loop, route another track such as a drum machine to the sidechain input of Aava and start recording from the sidechain input for some interesting creative exploration
IR Mode
Pitched IR mode
Pitched IR mode gives you optional key follow and quantizing Speed / Pitch (see IR parameters) to semitones.
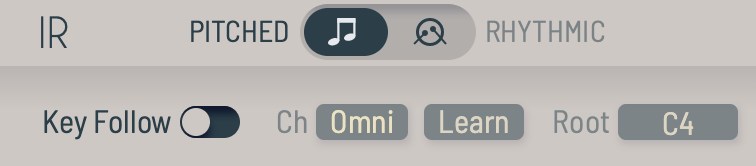
- Enable Key Follow to automatically change Speed / Pitch based on incoming MIDI notes
- Channel defaults to Omni but can be changed manually or learned by pressing the Learn button
- Root is estimated automatically based on pitch detection but can be adjusted manually
- Key follow responds to MTS-ESP
Rhythmic IR mode
Rhythmic IR mode allows you to sync Speed / Pitch (see IR parameters) to host tempo and to quantize it to multiples of x2 so it stays in sync.
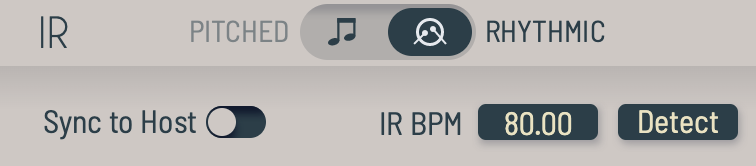
- Enable Sync to Host to match IR BPM with host tempo
- IR BPM is automatically estimated but can be changed manually
IR parameters
You will hear the effect of all parameters in this section at the next IR refresh.
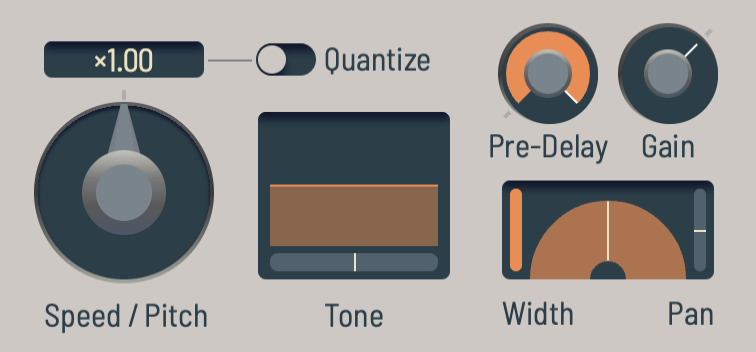
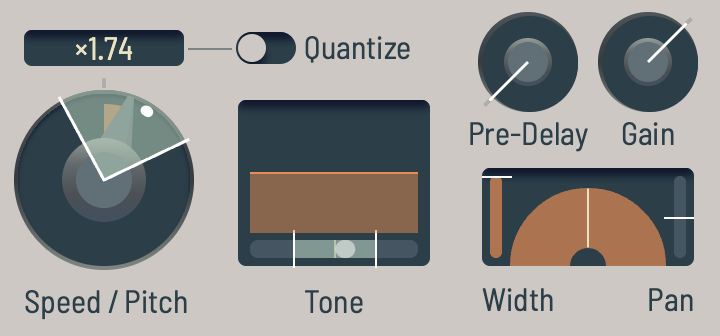
- Speed / Pitch adjusts the speed and pitch of the IR together like classic samplers
- With Quantize enabled, Speed / Pitch is quantized to either semitones or multiples of x2 depending on IR mode
- Tone is a tilt filter allowing you to emphasize or de-emphasize the lower or higher frequencies in case the output is to muddy or bright
- Pre-Delay simply inserts a delay between the incoming signal and when you start hearing the effects of this IR slot
- The Gain knob can either increase or decrease the gain of this IR part, very useful for gain matching the parts
- Width and Pan control the stereo image of the IR
Bottom pane
IR refresh
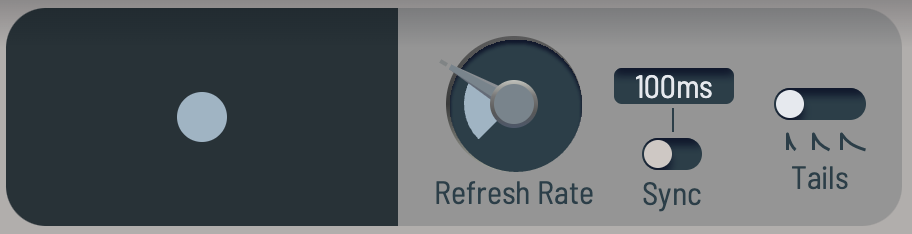
Adjustments in the IR editor and IR parameter sections won't take effect immediately since that would quickly overwhelm the CPU. Instead, in this section you can control how often those changes are applied. The default is 100ms which should be fast enough for real-time edits, but it can be set to as fast as every 64 samples! You can also enable Sync to sync the refresh rate to host tempo for musical results.
Whenever an IR refresh happens, old tails keep using old parameter values so if you change IR parameters and the input is silent, you won't hear their effect. You can set the length of these old tails using the Tails toggle; short (almost immediate), medium (roughly one second) or long (play until the end). Press the Cut button to immediately cut tails.
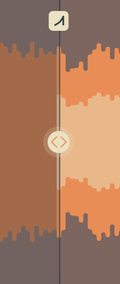
On the left you can see a visualization of when the next IR refresh is happening by the color of the circle in the center (useful when refresh rate is set to a longer period) and also ongoing refreshes for all four IR parts.
Master output
Parameter adjustments in this section take effect immediately.
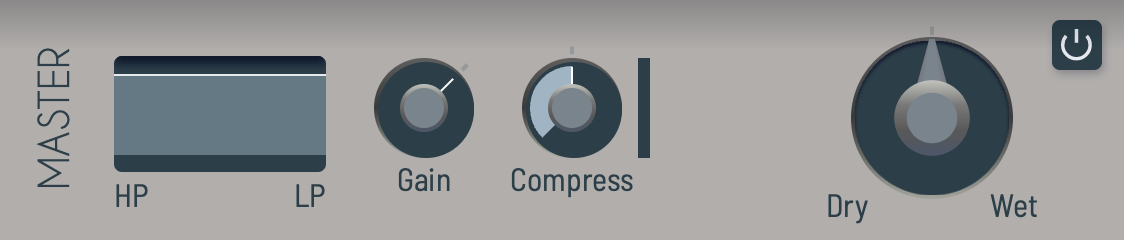
- Use the filter to cut out excessive low or high signals in the combined wet output
- Use Gain to adjust final wet output level
- Use the spectral compressor to tame any resonant peaks or runaway volume levels
- The big Dry / Wet knob adjusts balance between dry and wet signal levels
- Use the bypass toggle to quickly mute wet output completely
Modulation
Modulator slots
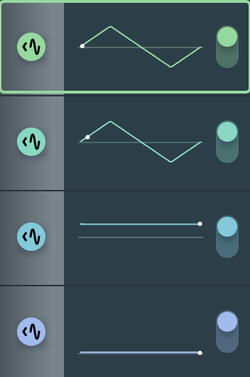
Aava has four modulator slots each with an independent modulator type and parameters.
- In the middle you can see a visualization of the modulator shape with a dot indication the current value
- Press the slots to select which modulator to edit
- Press the button with the arrow and waveform symbol to assign modulation
- Use the toggle to turn the modulator on or off
Modulators
LFO
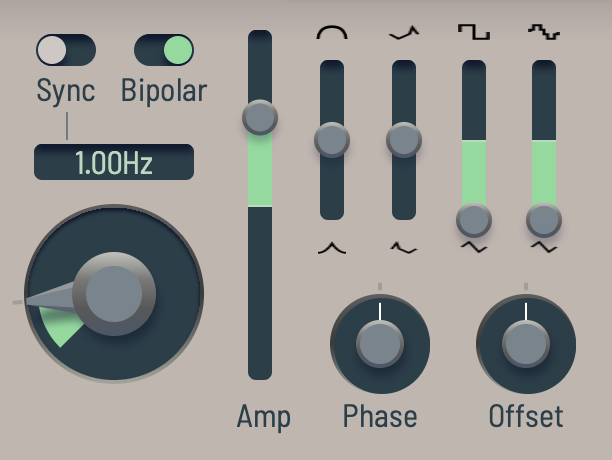
- Use the big knob to set the LFO rate
- Using the Sync toggle, the LFO can be synced to host tempo
- LFOs are bipolar by default; use the Bipolar toggle them between unipolar and bipolar
- The Amp slider sets the overall amplitude of the LFO affecting all modulation routes
- Use the four shape sliders to set the shape of the LFO, from square to saw, sine, triangle and beyond
- Phase is especially useful for synced LFOs to set their phase relative to beats or each other
- Phase is also a good modulation target to get even more complex or dynamic shapes
- Offset can be used to move the LFO up and down
Sample & hold
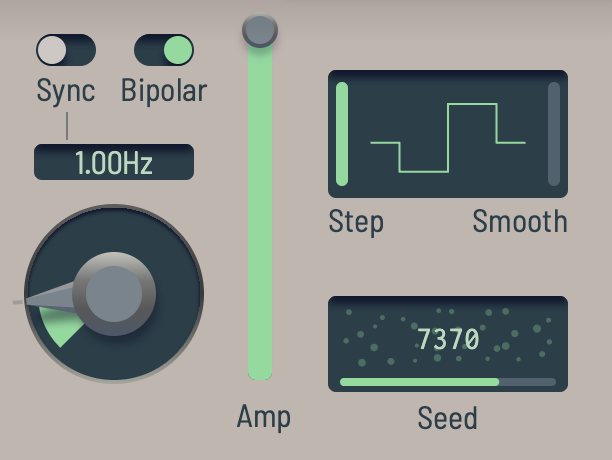
- Use the big knob to set the S&H rate
- Using the Sync toggle, the S&H modulator can be synced to host tempo
- Synced S&H modulators output the same sequence every time
- S&H modulators are bipolar by default; use the Bipolar toggle them between unipolar and bipolar
- The Amp slider sets the overall amplitude of the S&H modulator affecting all modulation routes
- Step sets the maximum step size between samples
- Smooth can be increased to glide between values instead of snapping
- Seed can be used to change the sequence generated by the S&H modulator
- Modulators with the same seed and rate will output the same sequence
- Different plugin instances with the same seeds will produce a different sequence
AD/AR envelope
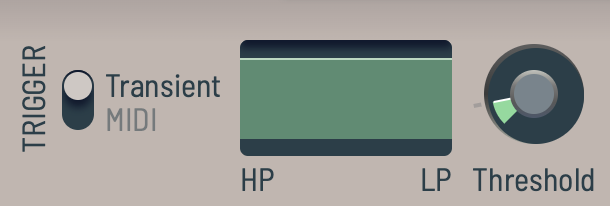
In Transient mode, the envelope triggers when the input signal exceeds the specified threshold.
- Use the low and high pass filters to select the frequency spectrum the transient detectors responds to
- Use Threshold to set the level at which the envelope triggers
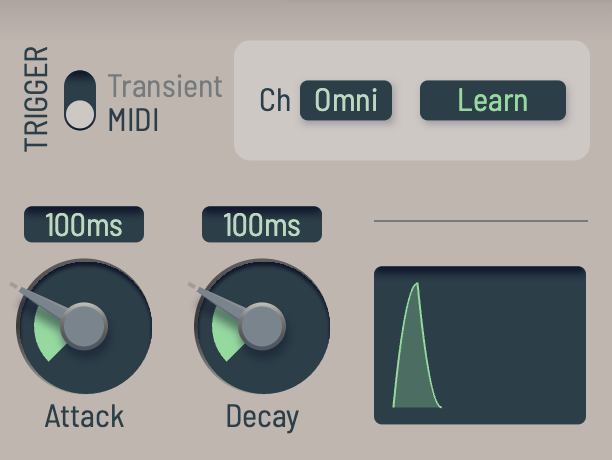
In MIDI mode, the envelope is triggered by incoming MIDI notes. You can select or learn which channel it responds on.
- Attack and Decay/Release knobs set the length of the attack and decay/release phases of the envelope, respectively
- There's also a small preview of the envelope shape
Envelope follower
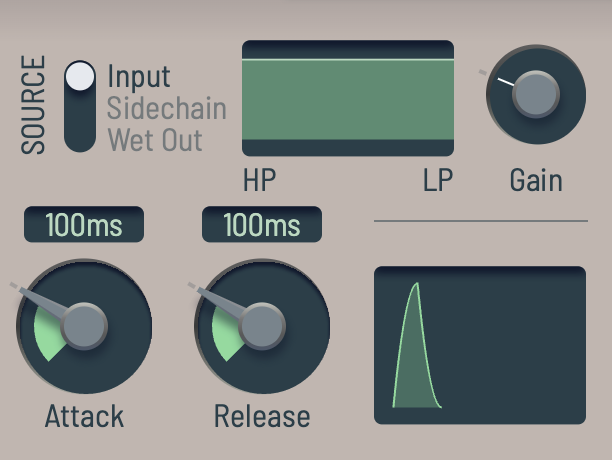
- Source selects what the envelope follower listens to
- You can fine select the frequency range it responds to using the LP and HP filters
- You can use the Gain knob to select how strongly the envelope follower reacts to the signal
- TIP: Set Gain so that the modulator reaches its highest level at the loudest expected sound levels
- Attack and Decay knobs set the response time when the envelope time is rising or falling, respectively
- There's also a small preview of the envelope shape
Key follower
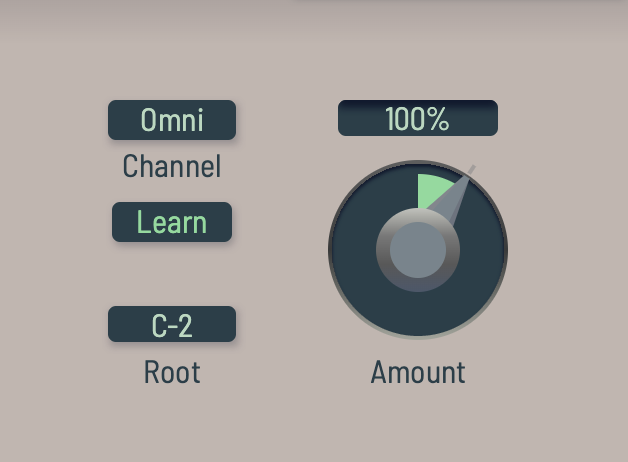
Key follower simply converts incoming MIDI note numbers into a modulation value. You can use Amount to increase or decrease modulation amount to match incoming note range to desired modulation range. You can select or learn which channel it responds on and which root note it's centered around. The key follower modulator responds to MTS-ESP.
Assigning modulation
Use the small buttons at each modulation slot to toggle modulation assign mode on or off. When the mode is on, a modulation overlay will appear on top of most controls. When modulation amount is at zero, it will look like a white line. When it's more than zero, the modulation range is visualized with the color of the modulator you're currently assigning. Drag the controls as usual to set modulation amount or double-click to reset amount to zero.
Modulated controls will also get modulation indicators that look like small white circles. This will also appear when the modulation assign mode is off.
Tabbed section
Explore map
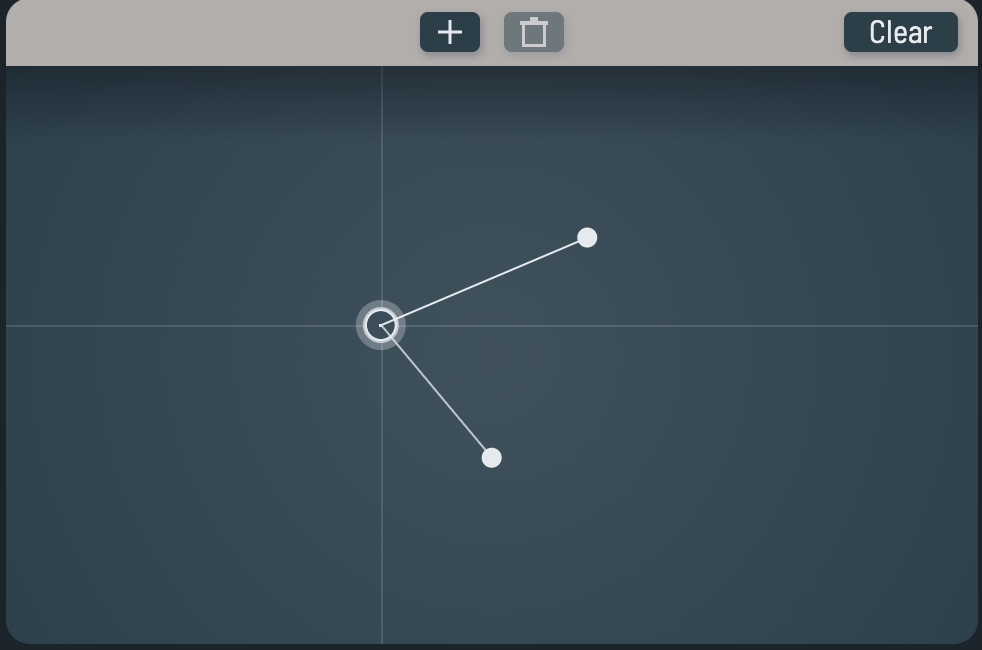
On the explore map, each node (filled circle) represents a plugin state (a snapshot of all parameters) while the cursor (hollow circle with a crosshair centered on it) is used to interpolate between those states.
- Use the
+ button to add a new node
- Use the trash can button to delete the selected node
- Use the Clear button to delete all nodes
- Click or drag the map to move the cursor around
- Click a node to select it
Cmd / Ctrl drag a node to move it around- Selecting a node will set all parameters to what's saved on that node
- If the cursor is between nodes, the plugin state will become a mix of nearest nodes; the brighter the line from the cursor to a node, the stronger its influence
- If you have a selected a node, adjusting parameters will automatically save the changes to that node
- If you are between nodes, adjusting parameters will automatically create a new node
- TIP: if you find a state between nodes that you like, create a new node there to save the intermediate state
Mod matrix
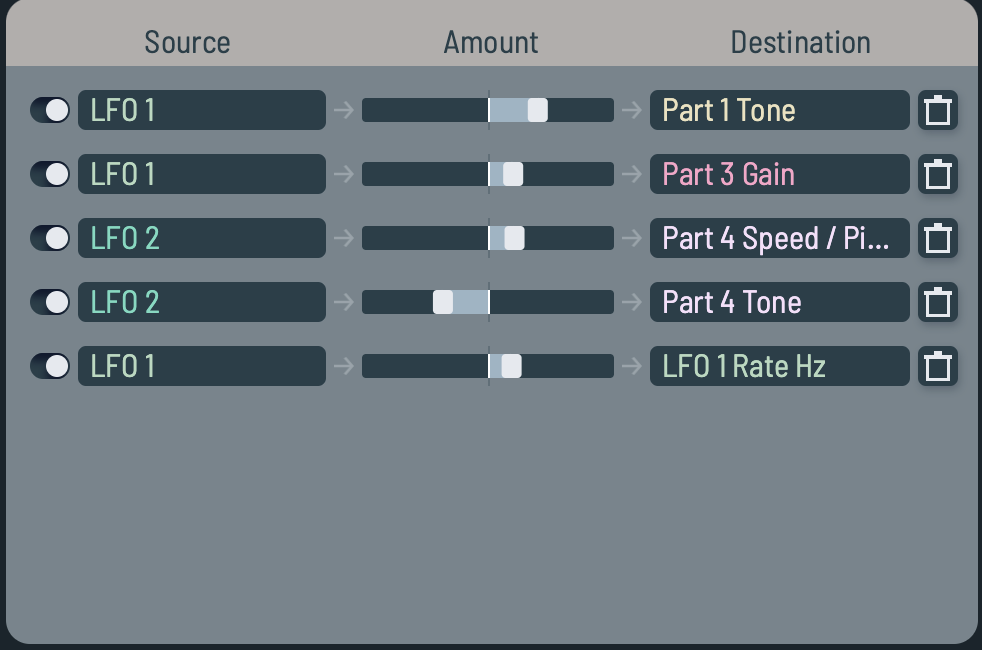
The mod matrix shows all the modulation happening in Aava at a glance.
- Use the toggle to the left of each row to turn that modulation route on or off
- Use the slider to set the modulation amount
- Use the trash can icon to delete the modulation route
- To add new modulation routes, use the modulation assign interface
Settings
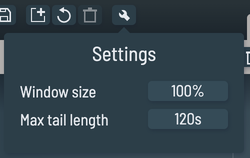
Clicking the wrench button opens the settings popup where you can set the plugin window size and adjust maximum tail length. Maximum tail length affects both CPU and memory usage of Aava.
Tip: you can also set the plugin window size by right clicking an empty area to open a context menu.

Convolution can be an expensive process for the CPU and especially so when you're constantly (re)generating IRs in response to parameter changes. Aava will use more memory than most convolution plugins to enable the real-time modulation and recording features. You can also expect it to be heavier on the CPU if you use the modulation modes or automate parameters heavily.
That being said, here are some tips to maximize performance.
- Aava only regenerates IRs if IR parameters (those in the IR editor and IR parameter sections) have changed
- Whether you change one parameter or many doesn't have an effect on this cost, or if they are changed by hand, by automation or by internal or external modulation
- You can see a new "flower" in the bottom left corner whenever an IR is regenerated; the "flower" will disappear if the tail is cut
- As a rule of thumb, the brighter the "flower arrangement" is, the more CPU you are using
To increase performance, you can:
- Use shorter IRs
- Shorten tail length in the IR refresh section
- Increase IR refresh rate in the IR refresh section
- Shorten maximum tail length in Settings (this also decreases memory use)
Credits
Concept, design and code
- Jussi Viiri / Viiri Audio
Visual design
- Hannes Pasqualini / Papernoise Design
IRs
- Adam Townsell
- Audiolab, University of York, Jack Smith, Juan García, Hashim Riaz, Pau Rosell, Dr. Damian T. Murphy
- Conner
- DATABROTH
- Florian Mrugalla
- Jussi Viiri
- Mechlab Productions
- Nicholas A. Judy
- tildesounds
- Trevor Cox
- Venus Theory
- worblyhead
- www.openairlib.net
Presets
- DATABROTH
- Florian Mrugalla
- Jussi Viiri
- Mechlab Productions
- tildesounds
- worblyhead
Thanks to all my lovely testers and everyone who helped on the Viiri Audio, The Audio Programmer and Rust Audio Discord servers, you know who you are!
Conner's Impulse Response Library license
Copyright © 2022 Conner
Permission is hereby granted, free of charge, to any person obtaining a copy of this software and associated documentation files (the "Software"), to deal in the Software without restriction, including without limitation the rights to use, copy, modify, merge, publish, distribute, sublicense, and/or sell copies of the Software, and to permit persons to whom the Software is furnished to do so, subject to the following conditions:
The above copyright notice and this permission notice shall be included in all copies or substantial portions of the Software.
THE SOFTWARE IS PROVIDED "AS IS", WITHOUT WARRANTY OF ANY KIND, EXPRESS OR IMPLIED, INCLUDING BUT NOT LIMITED TO THE WARRANTIES OF MERCHANTABILITY, FITNESS FOR A PARTICULAR PURPOSE AND NONINFRINGEMENT. IN NO EVENT SHALL THE AUTHORS OR COPYRIGHT HOLDERS BE LIABLE FOR ANY CLAIM, DAMAGES OR OTHER LIABILITY, WHETHER IN AN ACTION OF CONTRACT, TORT OR OTHERWISE, ARISING FROM, OUT OF OR IN CONNECTION WITH THE SOFTWARE OR THE USE OR OTHER DEALINGS IN THE SOFTWARE.

